Screen resolution is a way of measuring that is based on the number of pixels. The higher the number of pixels, the sharper the text and images will appear when viewed on the screen. The resolution that can be used depends on the structure of the display and the capacity of the video card. Modern operating systems automatically detect the optimal resolution that can be supported by the computer monitor and graphics card. Resolution is represented by the combination of pixels relative to the width and height of the image that can be displayed on the screen (for example 1920 x 1080) or by the use of specific terms, such as 4K / UHD (which refer to a resolution of 3840 x 2160) and Full HD / 1080p (equivalent to a resolution of 1920 x 1080). This article explains how to find the resolution in use on a PC, Mac or Chromebook.
Steps
Method 1 of 3: Windows
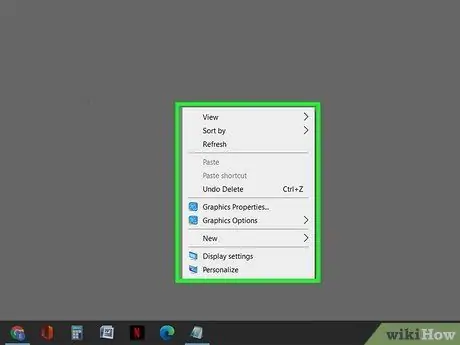
Step 1. Click on an empty spot on the desktop using the right mouse button
A context menu will be displayed.
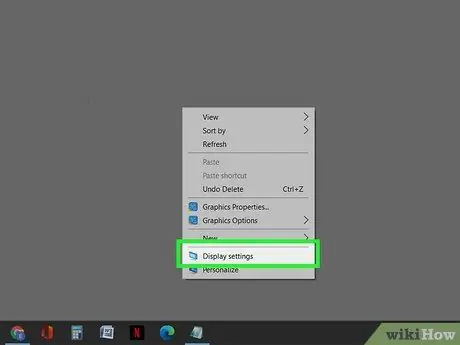
Step 2. Click on the Screen Settings item
The screen settings management window will appear.
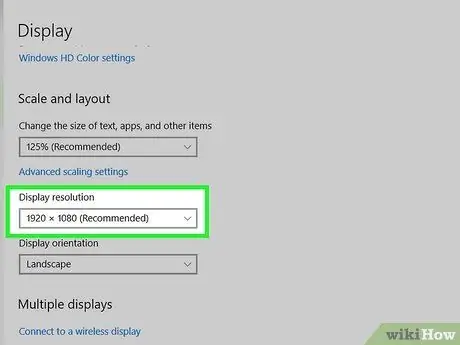
Step 3. Find the current resolution visible within the "Screen Resolution" section
The video resolution currently in use will be displayed in the drop-down menu indicated. If "(recommended)" appears next to the current resolution, it means that this is the maximum resolution possible for the hardware available.
- If more than one monitor is connected to your computer, the corresponding list will appear at the top of the right pane of the window. In this case, select the monitor whose resolution you want to check.
- The options available are compatible with both the monitor and the graphics card. For example, if you have a monitor with a 4K resolution, but that option (3840 x 2160) is not available in the "Screen Resolution" menu, it most likely means that your computer's video card does not support that high resolution.
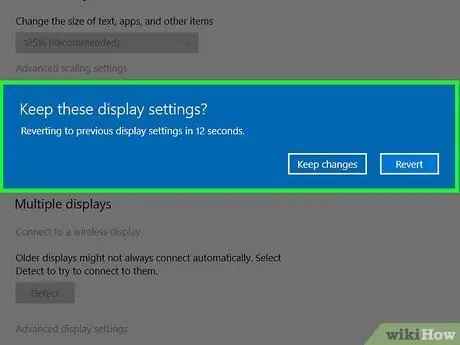
Step 4. Choose a different resolution using the options available in the menu (optional)
If you are using a resolution other than the recommended one, choose the one with the wording recommended choice for best results. Remember that using a resolution other than the recommended resolution will cause unsharp or distorted images to appear.
- After selecting the new resolution, it will be applied immediately. A pop-up window will appear on the screen in which there are buttons Keep changes or Reset to save the new settings or restore the previous ones. If you are not satisfied with the new resolution chosen, click on the button Reset.
- If the screen remains black after changing the resolution, the new resolution is not compatible with the computer monitor. In this case, after a few moments, Windows will automatically restore the previous settings to solve the problem.
Method 2 of 3: Mac
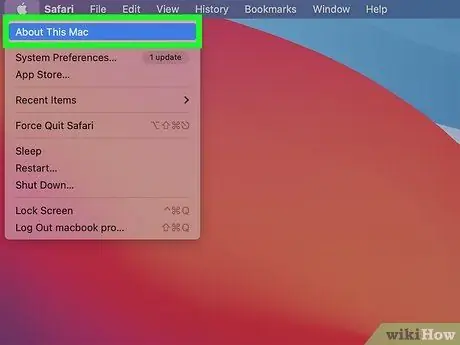
Step 1. Click on the "Apple" menu and choose the About This Mac option
The "Apple" menu is located in the upper left corner of the screen.
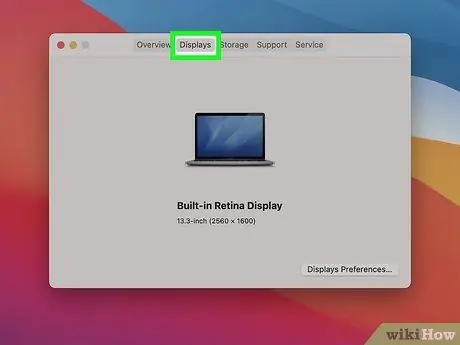
Step 2. Click on the Monitor tab
It is listed at the top of the window that appeared.
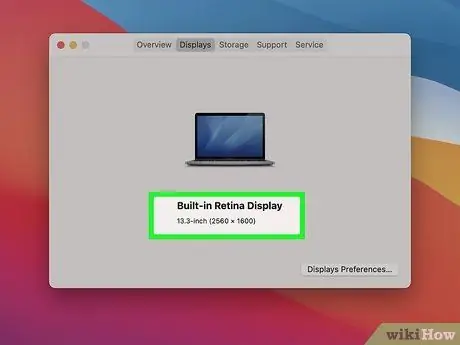
Step 3. Find your screen resolution
The current value appears next to the physical dimensions of the monitor, for example 23 inches (1920 x 1080).
If multiple monitors are connected to your Mac, each will be listed in the window and the corresponding resolution will be specified for each
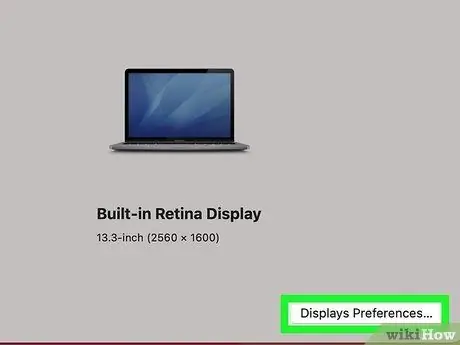
Step 4. Click the Monitor Preferences button if you need to change the screen resolution (optional)
It is located in the lower right corner of the window. By default, the macOS operating system is able to determine and select the optimal resolution for your Mac monitor. If the optimal video resolution is already in use, the "Default for monitor" option will be selected.
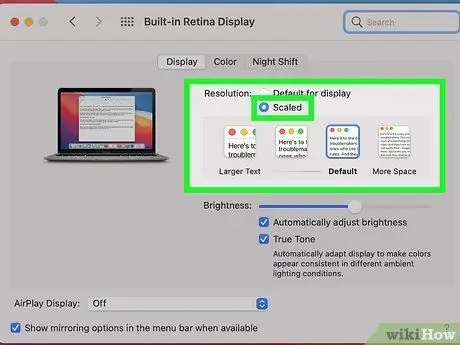
Step 5. Select the Resized item and choose a different resolution (optional)
If you need to change the video resolution of the screen, you can do so by selecting the option Resized. Normally the options you have available are supported by both the monitor and the Mac graphics card. For example, if you have a monitor with a 4K resolution, but that option (3840 x 2160) is not available in the menu, it most likely means that the Your Mac's video card does not support such a high resolution.
- If you want to change the resolution of the second monitor, press and hold the key Option of the keyboard while clicking on the item Resized.
-
When you select a resolution, it will be set immediately. If the Mac screen shows no image and remains black, the resolution you choose is not supported. The problem should be resolved automatically after about 15 seconds, as the previous video settings will be restored. If not, press the button Esc to force the restore procedure.
If the image still does not appear, restart your Mac in safe mode, click on the "Apple" menu, select the option System Preferences, click on the icon Monitor, then click the tab Monitor. Now select the option Default for monitors in order to use the optimal resolution, then restart your Mac.
Method 3 of 3: Chromebook

Check Your Screen Resolution Step 10 Step 1. Click on the system clock
It is displayed in the lower right corner of the screen.

Check Your Screen Resolution Step 11 Step 2. Click on the icon depicting a gear present in the menu that appeared
Chromebook configuration settings will be displayed.

Check Your Screen Resolution Step 12 Step 3. Click on the Device tab
It is listed in the left pane of the window.

Check Your Screen Resolution Step 13 Step 4. Find the video resolution listed next to "Resolution"
The video resolution currently in use by the computer is the one shown in the "Resolution" drop-down menu.
If you need to change the resolution currently in use, click on the menu in question and choose one of the available options. A preview of the new settings will appear along with a pop-up window asking if you want to keep the new configuration. Click on the button Continues to keep the new resolution settings. Alternatively, click on the button Cancel to restore the previous video settings. However, waiting about 10 seconds will automatically restore the previous resolution.
Advice
- The pixel is a small bright spot that is the basis of modern digital screens and that can change the color of the light emitted according to what is to be displayed on the screen. All the pixels that make up the screen work in harmony to give life to the images that are displayed.
- Most high-resolution displays use an image resizing system that prevents user interface elements from appearing shrunken when using higher video resolutions. This system allows manufacturers to create high resolution displays for even small electronic devices.
- A higher resolution means that the screen has a higher number of pixels. By decreasing the resolution all the elements displayed on the screen will be larger.


