Converting an Excel file to PDF format makes it accessible to all users, including those who don't have Office installed on their computer. In addition, the processes of printing and sharing the data in your Excel sheet are simplified. Microsoft Excel allows the user to export data in PDF version directly from the program, but if you do not have Microsoft Excel installed on your computer, you can use one of the many online services to perform the conversion.
Steps
Method 1 of 2: Use Excel (Windows version)

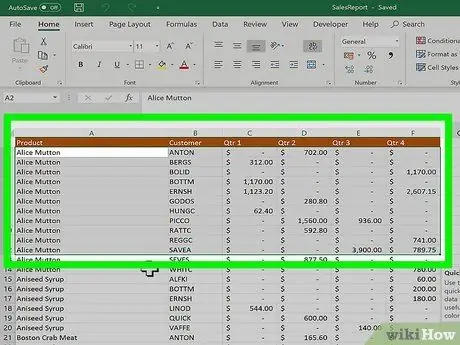
Step 1. Select the part of the worksheet you want to convert to PDF (optional)
If you only want to convert part of the spreadsheet, this is the time to select the data to export. If not, proceed to the next step.
Note that a PDF is not easily converted to Excel format, but this method allows you to keep a copy of the original Excel file
Step 2. Go to the "File" tab
If you are using an older version of Excel, you need to click on the "File" menu.
Step 3. Select the "Export" item
If you are using Excel 2010 or an earlier version, select the "Save As" option instead.

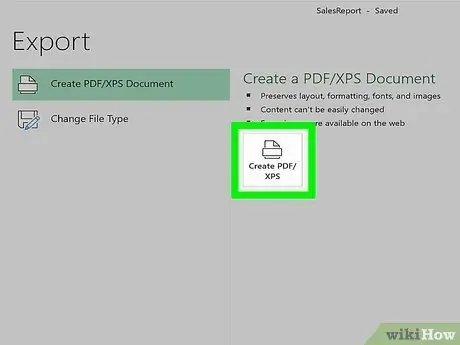
Step 4. Choose the "Create PDF / XPS Document" function
If you are using Excel 2010 or an earlier version, select the "PDF" option from the "Files of type" drop-down menu located in the "Save As" dialog box.
In order to make the process easier, Microsoft Excel has an internal PDF conversion function

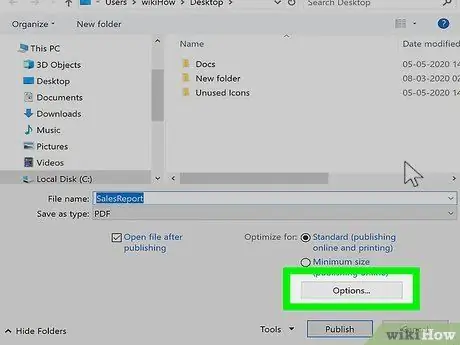
Step 5. Press the button
Options….
This way you will have the possibility to change the export settings of the PDF file you are about to create.
Step 6. Choose what you want to include in the PDF file
From the "Options" dialog you can select the set of pages to include, for example opting for the final PDF file to be generated based on a data selection, the entire workbook or only the active sheet. You can also specify whether the created file should include the properties of the original document.
Once you have finished making your selection, press the OK button
Step 7. Choose how to optimize the file (optional)
Next to the Options… button, you will find the options related to the optimization of the PDF document. Most people choose the "Standard" option, unless the worksheet is very large.
Step 8. Name the file and save it
Name your PDF file, then press the Publish button to create the PDF (if you are using Excel 2010 or earlier, press the Save button).
Step 9. Check the created PDF
By default, the PDF file after creation will open automatically, allowing you to check its correctness and appearance. If you can't open the PDF file, you probably don't have a PDF viewing program installed.
At this point it is no longer possible to edit the PDF, so if you need to make changes you have to do it on the Excel file and then proceed again to export the data in PDF format by creating a new file
Method 2 of 2: Using Excel 2011 (Mac Version)
Step 1. Make sure the header and footer of all sheets are the same (optional)
Excel 2011 converts all sheets of your Excel file to a single PDF only if the header and footer of each sheet are identical. Otherwise each sheet will be exported to a single PDF file, although you can always merge them into a single file at a later time.
- Select all the sheets in your workbook. Select the name of the first sheet, then, holding down the ⇧ Shift key, select the last sheet. In this way, all the sheets between the first and the last will be automatically selected.
- Select the "Page Layout" tab, then choose the "Header and Footer" option.
- Press the Customize header… and Customize footer… buttons to change the header and footer of each single sheet.
Step 2. Select the part of the worksheet you want to convert to PDF (optional)
If you only want to convert part of the spreadsheet, this is the time to select the data to export. If not, proceed to the next step.
Note that a PDF is not easily converted to Excel format, but this method allows you to keep a copy of the original Excel file
Step 3. Access the "File" menu and select the "Save as" item
Navigate to the folder where you want to save the PDF file, then give it a name.
Step 4. Select the "Format" drop-down menu and choose the "PDF" option
This will create a copy of your Excel file in PDF format.
Using the PDF converter present in Excel is the best way to turn your Excel file into PDF
Step 5. Decide what to include in the PDF file
At the bottom of the dialog you can choose from the following options: "Workbook", "Sheet" and "Selection".
Step 6. Press the button
Save to create the PDF file.
If the headings of the individual sheets are not identical, a PDF file will be generated for each individual sheet. Note that this can occasionally occur even when the header and footer of each individual sheet match perfectly.

Step 7. Merge the individual PDF files (if needed)
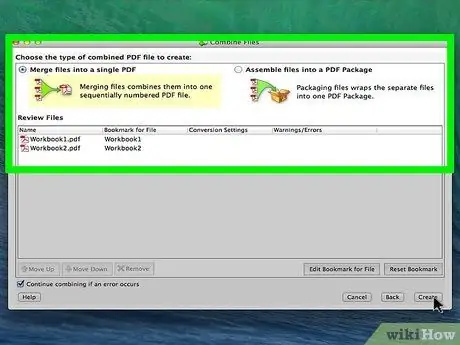
If you have multiple PDF files following the conversion process, you can quickly merge them into a single file using Finder.
- Go to the folder where the PDF files are stored, then select all the ones you want to merge.
- Access the "File" menu, choose the "Create" item and finally select the "Combine files into a single PDF" option.
Step 8. Check the PDF file
Open it by selecting it with a double click of the mouse. This will open the file in question using Preview, allowing you to check its appearance and correctness before sending it to someone. At this point it will no longer be possible to edit the PDF, so if you need to make changes you have to do it on the Excel file and then proceed again to export the data in PDF format by creating a new file.


