The dryer is an extremely useful and convenient appliance in the laundry room. A rotary drum dryer might seem complicated to install, but by following this tutorial you will be able to do it in no time!
Steps
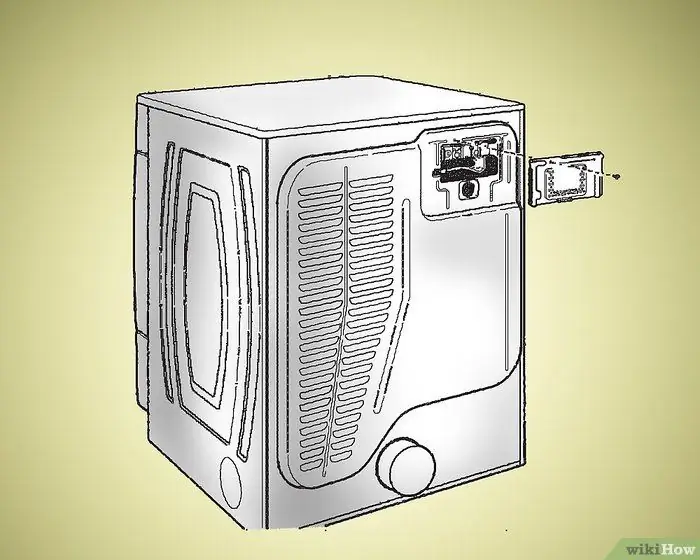
Step 1. Locate the terminal box (see figure)
Remove the retaining screw and the box lid. At this point, if you want to install the cable gland for the power supply, follow steps 2 and 3. If you want to install the direct cable gland of the power cable instead, go directly to steps 4 and 5.
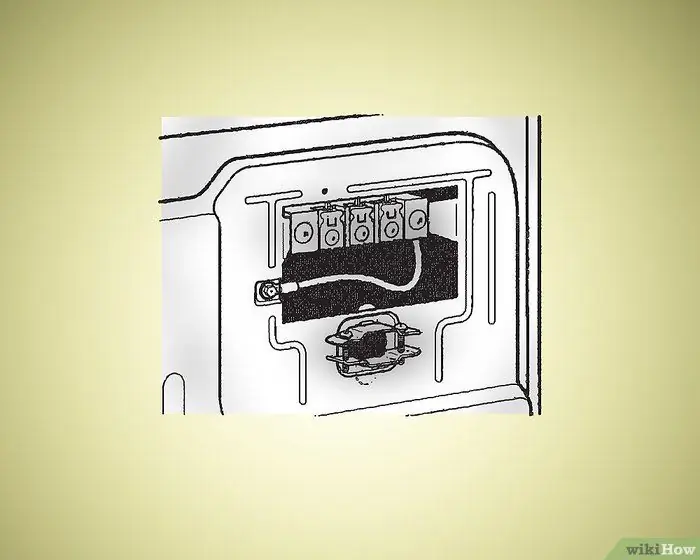
Step 2. Remove the screws of the cable gland (lower section)
Insert the two clamp plates into the hole under the terminal block opening, with one plate facing up and the other facing down. With one hand, hold the plates still and tighten the screws of the cable gland in order to lock the two sections of the terminal.
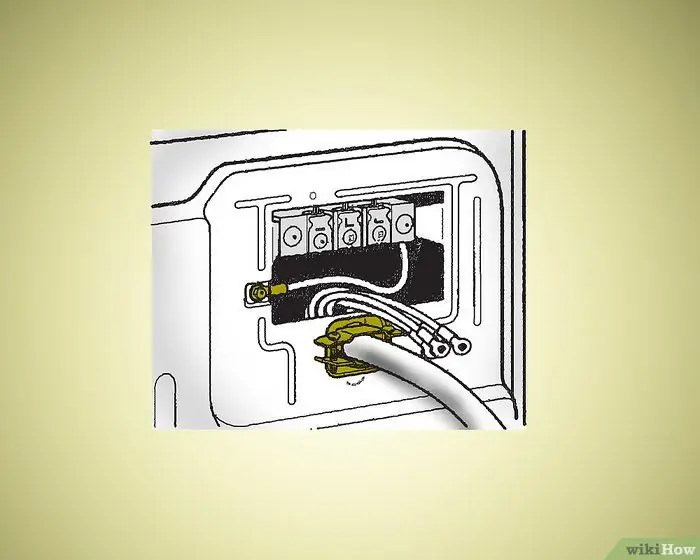
Step 3. Thread the power cord through the strain relief
It should remain horizontal, as shown in the figure, and remain narrow enough to stay in place without additional supports - do not tighten the screws on the cable. Now you can continue with step number 6.
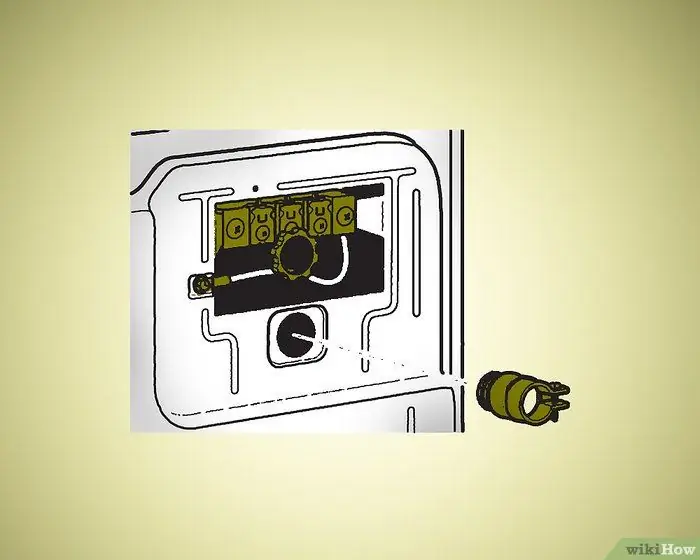
Step 4. Remove the conduit and its screws from the cable gland (lower part)
Thread the threaded portion of the strain relief into the hole under the terminal block opening. Screw the fitting with the threaded part of the cable gland.
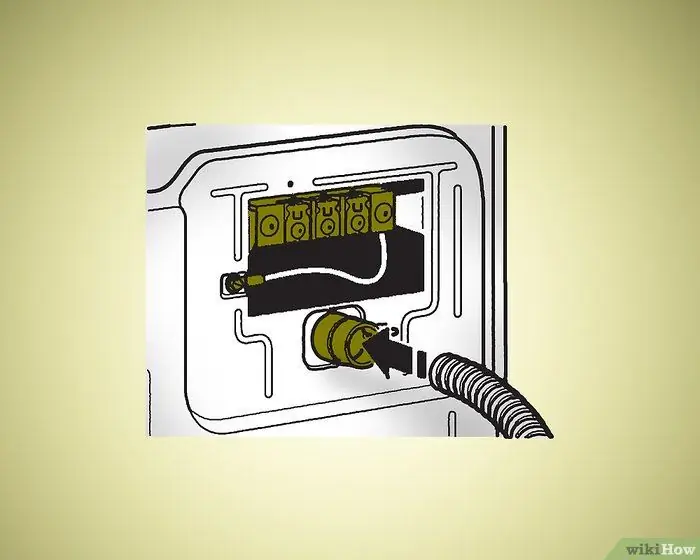
Step 5. Thread the direct strain relief with its electrical cord into the strain relief of the dryer
It should stay horizontal, as shown, and stay narrow enough to stay in place without additional supports. Tighten the screw of the cable gland directly on the cable itself, as shown in the figure. Now you can continue with step number 6.
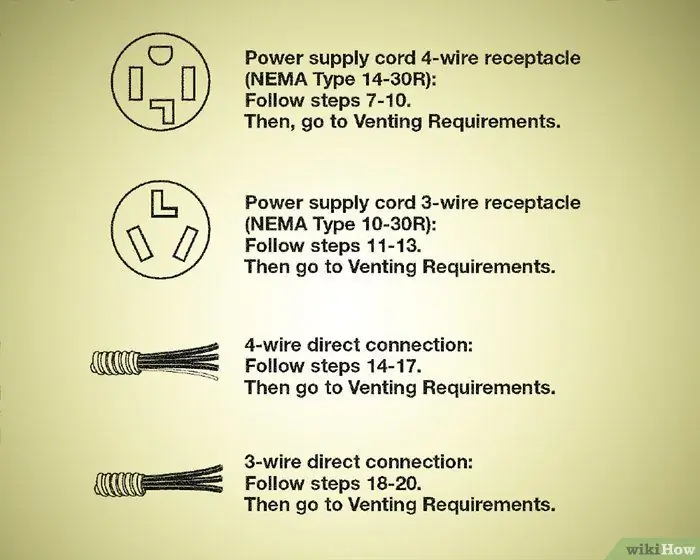
Step 6. Choose the type of electrical connection
- A 3-way or 4-way cable can be used for the power supply cable - for 4-way cables follow steps 7-10, while for 3-way cables follow steps 11-13.
- For cables with direct glands a direct 3-way or 4-way connection can be used - for direct 4-way cables follow steps 14-17, while for direct 3-way cables follow steps 18-20.
- IMPORTANT: in mobile homes it is mandatory to use 4-way connections, and some local regulations may prohibit the use of 3-way connections, so it is essential to make sure that you follow the regulations before making any kind of decision.
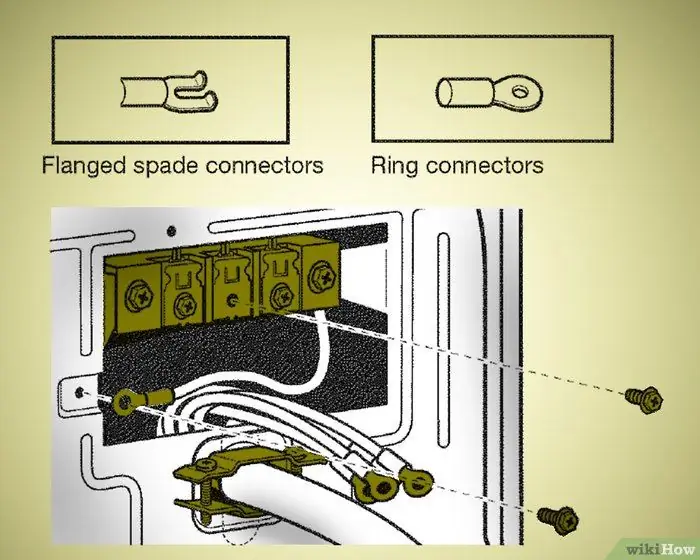
Step 7. Choose between flange and ring connectors
Remove the central chrome terminal block screw and the lower left grounding screw as shown.
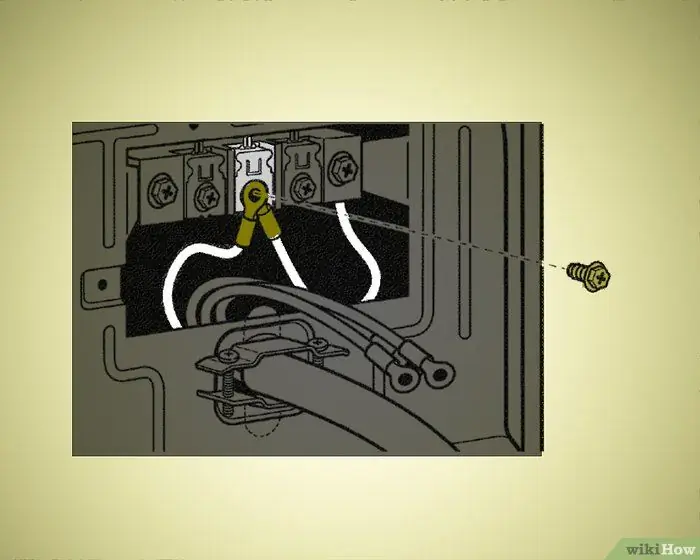
Step 8. Connect the ground wire and the neutral wire (which should be white)
Both of these wires should cross in the center terminal. Reinsert its screw and tighten it onto the wire connectors above.
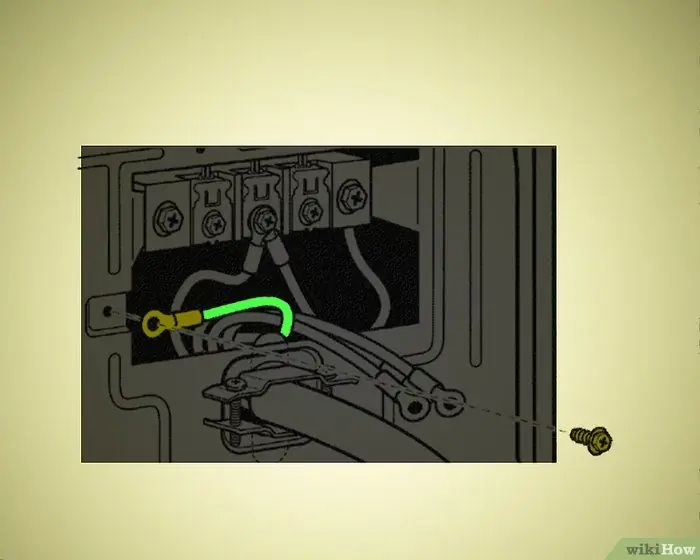
Step 9. Connect the ground wire (which should be green or yellow and green) to the bottom left connector
Reinsert its screw and tighten it onto the wire connector above.
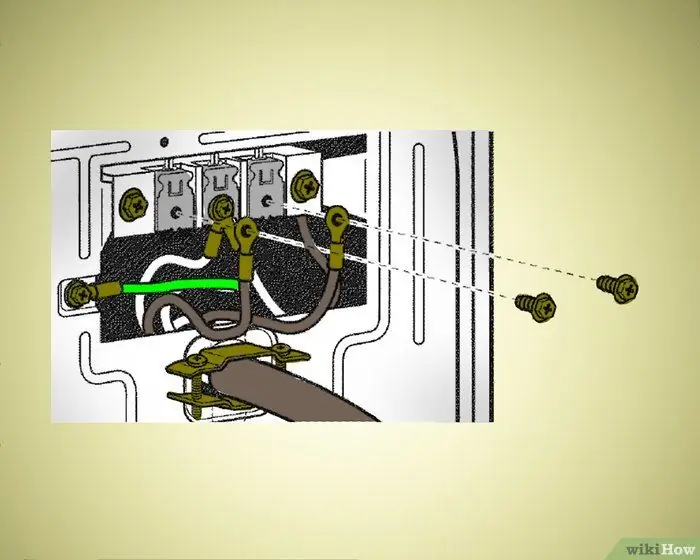
Step 10. Connect the remaining wires to the terminals on the sides of the center screw
Tighten the corresponding screws on the connectors of said wires, and then close the terminal block cover (which you removed in step 1) and secure it with the relative locking screw. At this point you can skip to step number 21, "Ventilation Requirements".
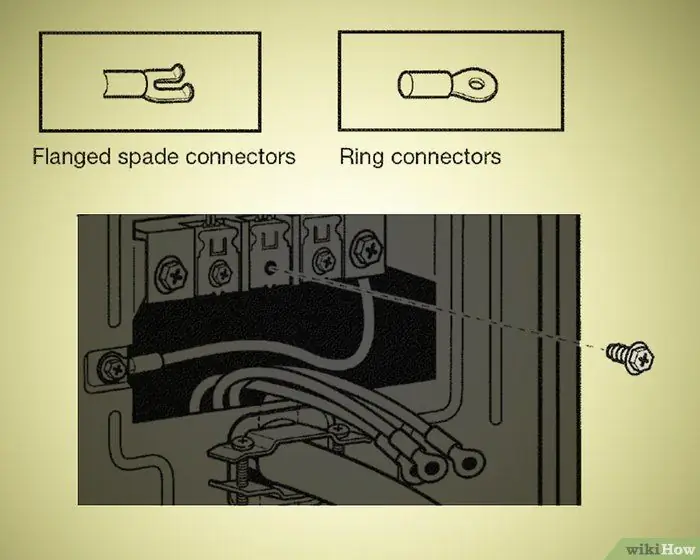
Step 11. Choose between flange and ring connectors
Remove the central chrome screw from the terminal block.
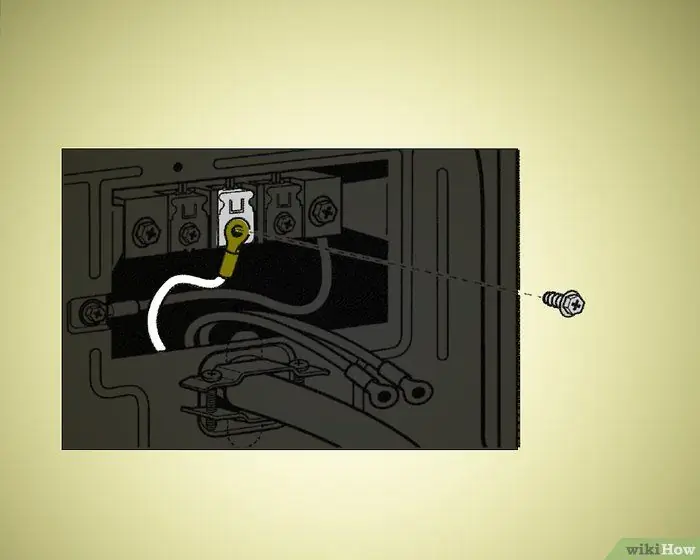
Step 12. Connect the neutral center wire (which should be white) to the center terminal
Put the screw back and tighten it on the wire connector above.
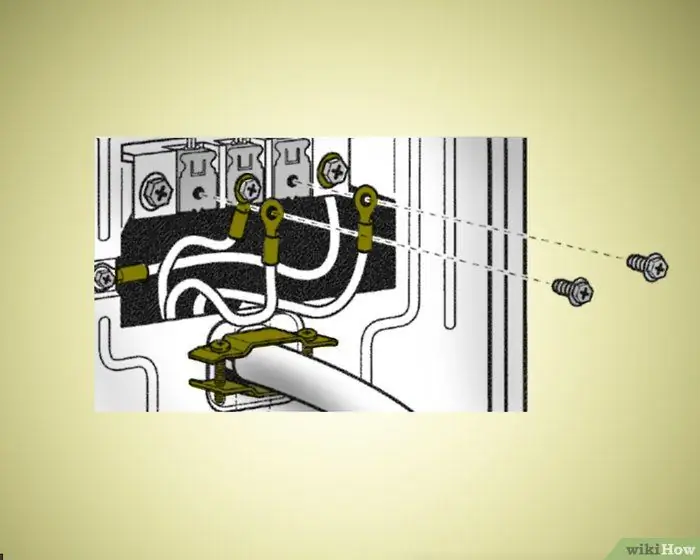
Step 13. Connect the remaining wires to the terminals on the side of the center screw
Tighten the screws on the relevant connectors of these wires, and then replace the terminal block cover (which you removed in step 1) and secure it with the relevant locking screw. At this point you can skip to step number 21, "Ventilation Requirements".
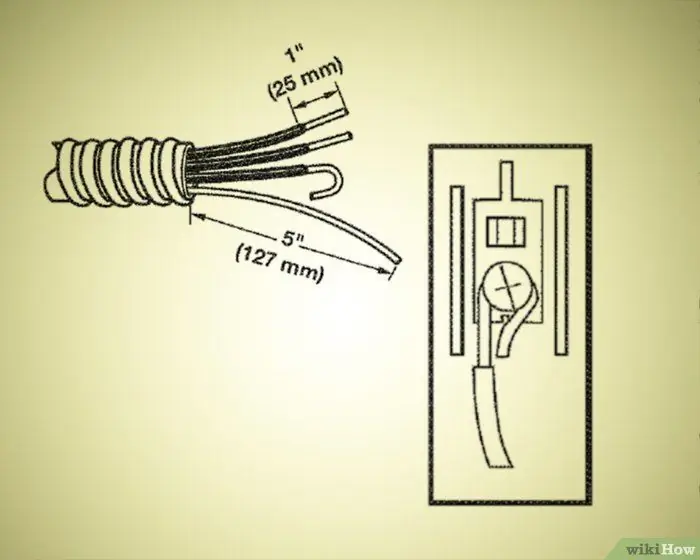
Step 14. Prepare the 4-way cable for direct connection
It should be at least 1.5 meters long to allow the dryer to move easily enough. Strip about 12 cm of the outer casing from the end of the cable, leaving the ground wire exposed. Cut about 4 cm of the other three threads. Shape the ends of the wires into hooks, then remove the chrome center screw of the terminal block and grab the neutral ground wire from the bottom left screw as shown.
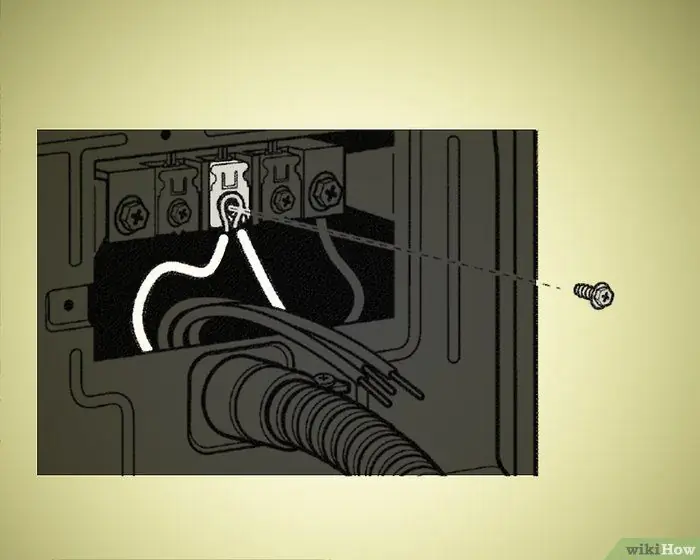
Step 15. Connect the neutral wire to ground and the small hook made on the end of the neutral wire (which should be white)
They should cross at the center terminal, with the neutral wire hook facing to the right. Weave the threads together and put the central screw back by tightening it on the end of these threads.
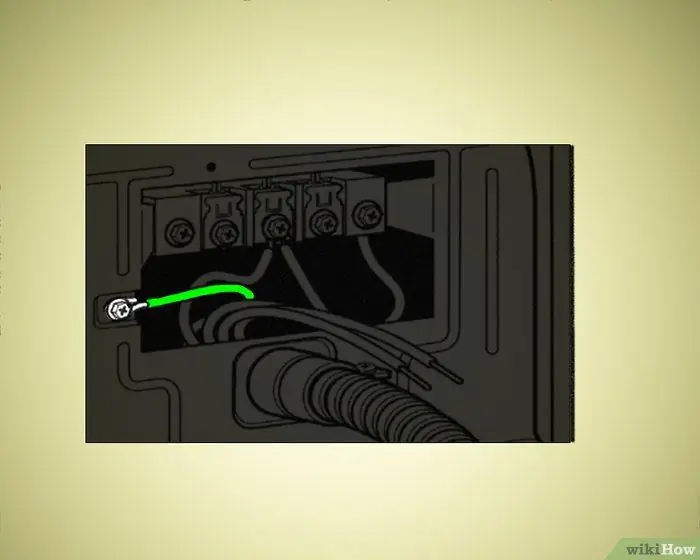
Step 16. Connect the end of the ground wire (which should be green or yellow and green) with the bottom left connector
Put the relevant screw back and tighten it on the end of this wire.
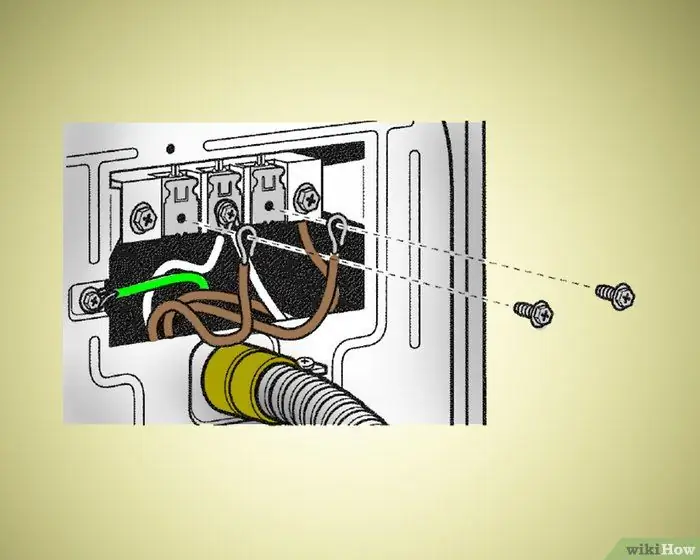
Step 17. Connect the hooked ends of the other wires to the terminals on the sides of the center screw
Tighten the relevant screws on these wires, and then replace the terminal block cover (which you removed in step 1) and secure it with the appropriate retaining screw. At this point you can skip to step number 21, "Ventilation Requirements".
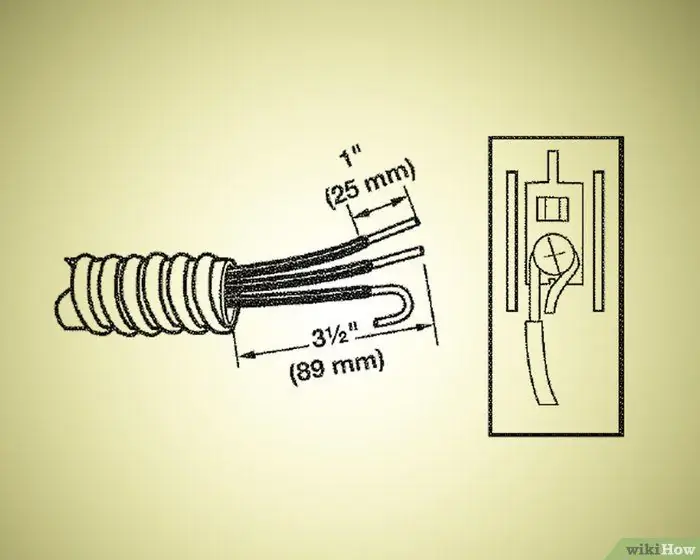
Step 18. Prepare the 3-way cable for direct connection
It should be at least 1.5 meters long for the dryer to move easily enough. Strip about 12 cm of the outer casing from the end of the cable, leaving the ground wire exposed. Cut about 9 cm of the other two threads. Shape the ends of the wires into hooks, then remove the chrome center screw from the terminal block.
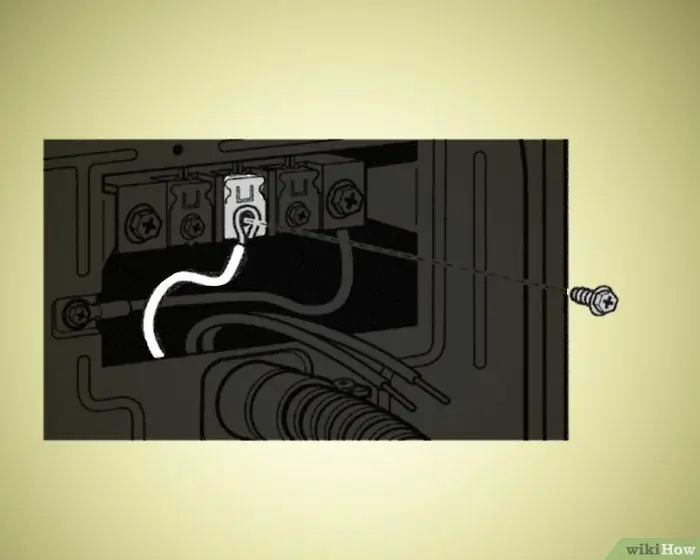
Step 19. Connect the hook end of the neutral to the center terminal, with the hook facing to the right
Weave the hooked ends of the threads together and replace the screw by tightening it onto the threads themselves.
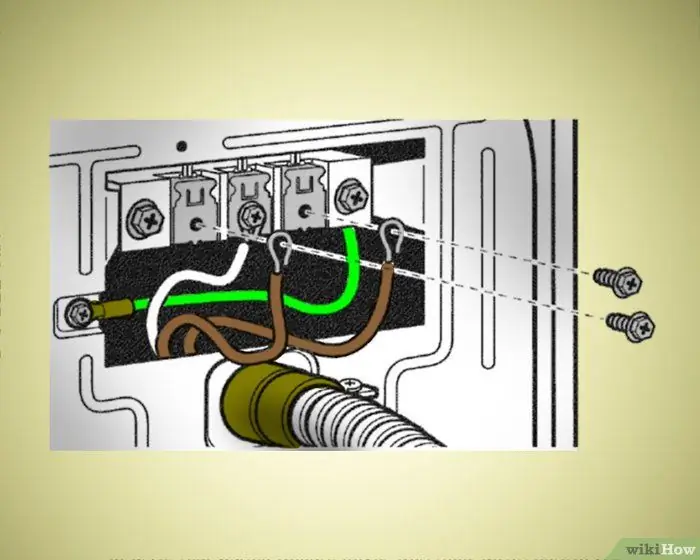
Step 20. Connect the hook ends of the other wires to the terminals on the side of the center screw
Tighten the relevant screws on these wires, and then replace the terminal block cover (which you removed in step 1) and secure it with the appropriate locking screw. At this point you can skip to step number 21, "Ventilation Requirements".
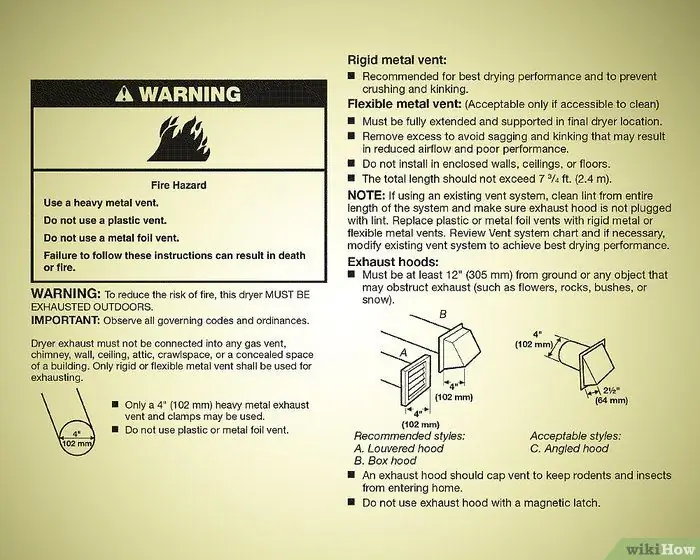
Step 21. Ventilation Requirements
This step is mostly a list of provisions, but don't skip reading it - many possible risks are highlighted that need to be avoided.
- First of all, the ventilation duct must be made of heavy metal, not plastic or metal foil.
- Choose the straightest and most direct outward path, with as few curves / elbows as possible.
- Bend the tube carefully so as not to compromise its effectiveness.
- It uses clamps to seal all the joints, and as far as the "elbows" of the pipe are concerned, those with a 45 ° angle are much more effective than those at 90 °.
- In mobile homes, the ventilation ducts must necessarily be firmly fixed to fireproof construction elements and the final part of the ventilation duct must end outside the structure itself.
- Remember that inadequate ventilation could cause moisture-related damage to wood structures, furnishings, wallpaper, etc., so make sure you follow all of these guidelines as you proceed.
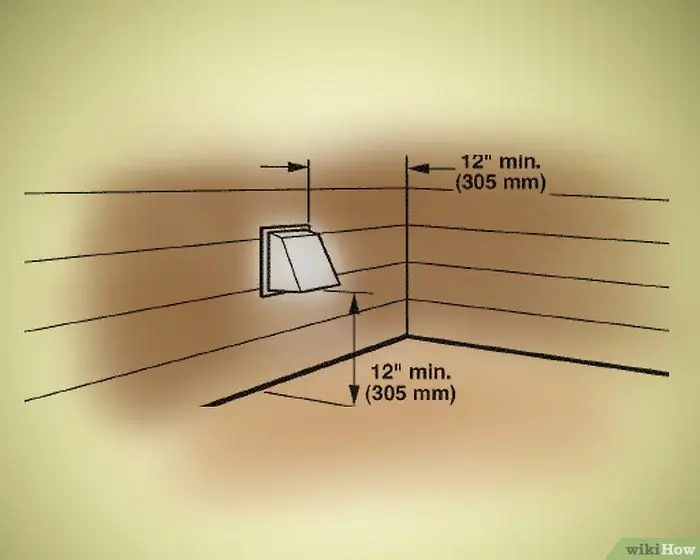
Step 22. Install the duct ventilation hood
To avoid leaks, use a sealant to insulate the outside of the wall around the hood.
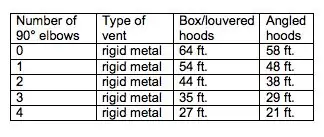
Step 23. Determine the length of the ventilation duct and the number of elbows needed
Follow the following pattern:
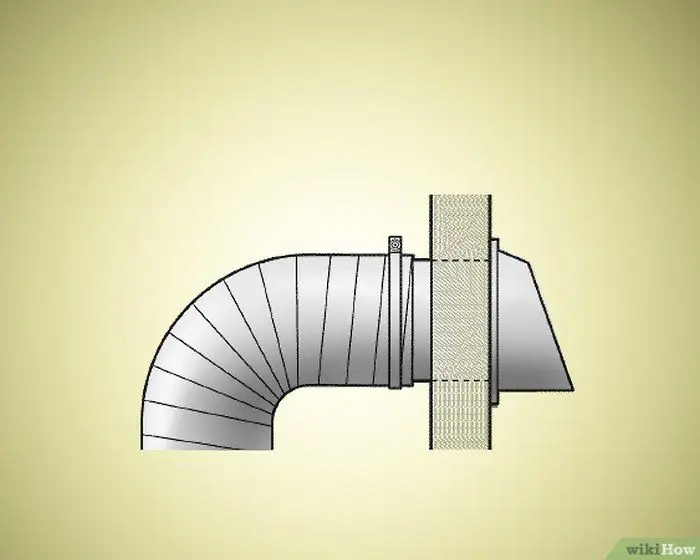
Step 24. Connect the ventilation hose to the hood
The hose MUST fit into the hood, and must be secured with a 4-inch clamp. Extend the hose to where the dryer is located, following the directions above for the Ventilation Requirements.
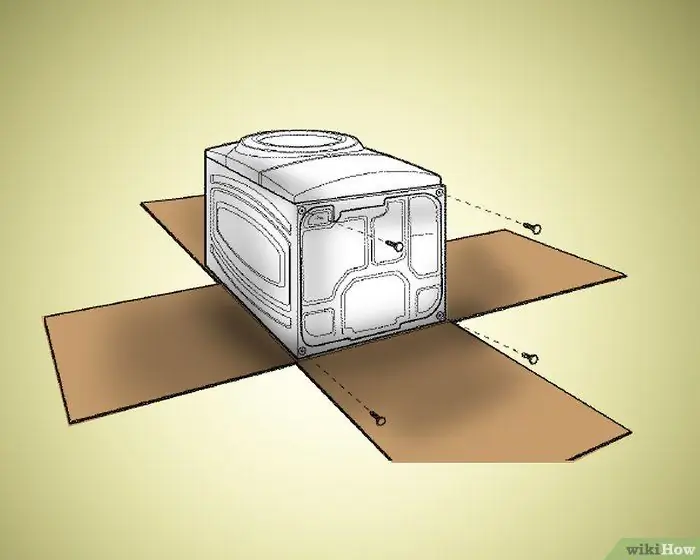
Step 25. Prepare the dryer to fit the leveling feet
Take a flat, fairly wide cardboard (for example you could take a piece of cardboard the dryer was packed with), and lay the dryer on its side or back carefully.
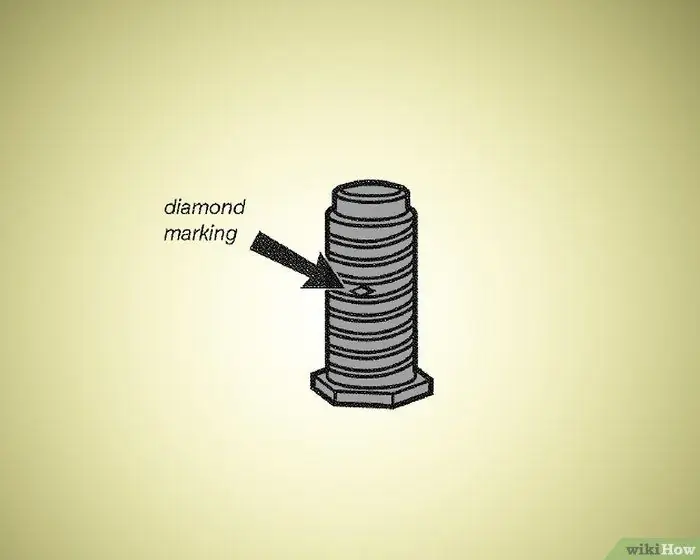
Step 26. Screw the leveling feet into the appropriate holes in the underside of the dryer
Use a wrench to screw them in until the diamond-shaped mark made in the middle of each foot is no longer visible.
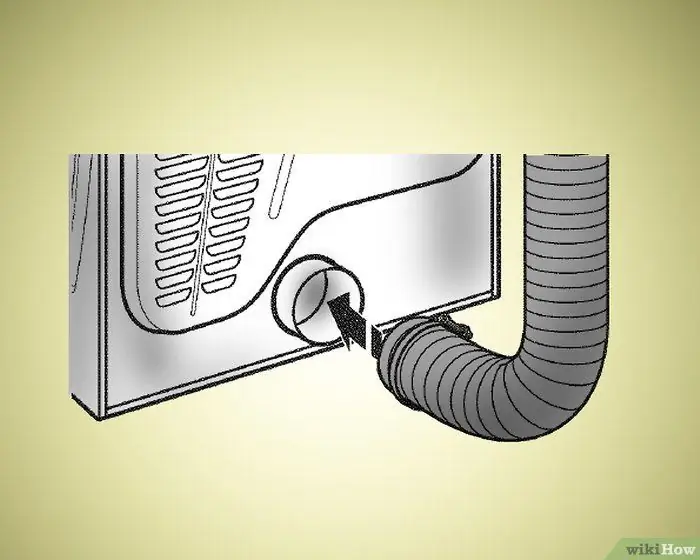
Step 27. Connect the vent hose to the vent outlet
Make sure the hose fits on the outside of the vent, and secure it with a 4-inch zip tie.
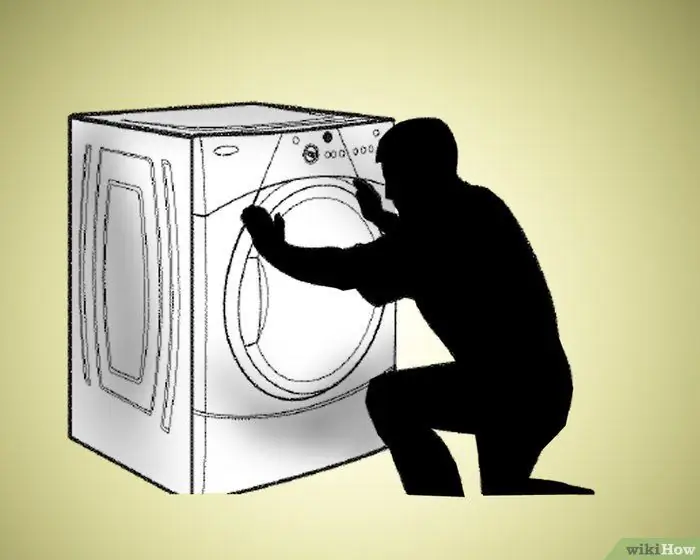
Step 28. Place the dryer in its final position
Still don't remove the cardboard, and take extra care not to damage the ventilation tube. Once the dryer is in place, you can remove the cardboard and level the feet using a wrench.
Warnings
- To minimize any kind of risk, read all instructions regarding the connections to your dryer, and make sure you are familiar with all ventilation requirements before proceeding with step 22.
- Do not try to change the position of the dryer without the help of at least one other person, as its weight makes it an inherently dangerous object.


