If your home network consists of multiple computers, by creating shared folders you can share data between all machines easily and efficiently. These directories will be accessible from all those computers connected to the network that have the necessary permissions, ensuring quick and easy access to shared files from anywhere on the network. Continue reading the article to find out how to share a folder through the most popular operating systems.
Steps
Method 1 of 3: Windows
Share a Specific Folder
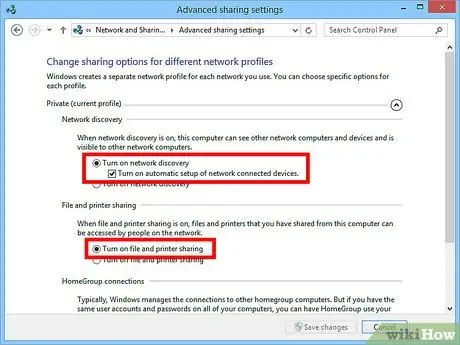
Step 1. Make sure "File and Printer Sharing" is turned on
To be able to share a folder it is essential that this Windows function is active. The procedure for activating this function varies according to the version of the operating system used. It is highly recommended that you do not enable data sharing while using public networks, such as at school or in public places.
- Windows 8: while you are in "Desktop" view mode, select the network connection icon on the taskbar with the right mouse button. From the context menu that appeared, choose the item "Open Network and Sharing Center". Select the "Change advanced sharing settings" link. Expand the profile whose data sharing you want to enable ("Private" or "Public"). Enable the "Network Discovery" and "File and Printer Sharing" features; at the end press the "Save changes" button and, if necessary, type the password of the computer administrator account.
- Windows 7: access the "Start" menu, type "control panel" in the search field and press the Enter key. Double-click the "Network and Sharing Center" icon. Select the "Change advanced sharing settings" link. Expand the profile whose data sharing you want to enable ("Home or work" or "Public"). Enable the "Network Discovery" and "File and Printer Sharing" features. At the end press the button "Save changes" and, if necessary, type the password of the administrator account of the computer.
- Windows Vista: access the "Start" menu and choose "Control Panel". Select the "Network and Internet" category, then choose the "Network and Sharing Center" link. Expand the items "Network discovery" and "File and printer sharing" located in the "Sharing and discovery" section; make sure that the features in question are all active. At the end press the "Save" button of each of the modified elements.
- Windows XP: access the "Start" menu and choose "Control Panel". Select the "Network Connections" icon. With the right mouse button click on the network connection related to your home network. From the context menu that appeared, choose the "Properties" option and check that the "File and printer sharing for Microsoft networks" check button is selected.
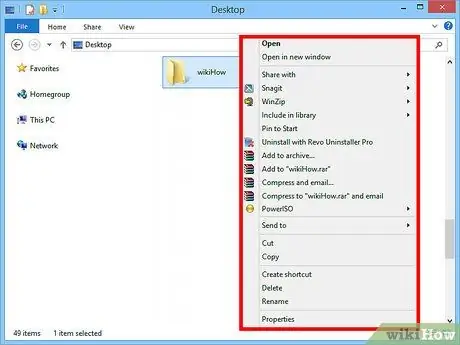
Step 2. Locate the folder you want to share
After enabling the "File and Printer Sharing" feature, you will be able to share any folder on your computer's hard drive on the network. Using the "Explorer" or "File Explorer" window, access the directory that contains the folder in question, then select it with the right mouse button.
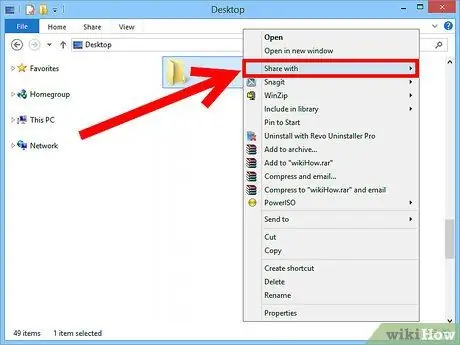
Step 3. From the context menu that appeared, choose the "Share with" option
The relevant sharing menu will be displayed. You can choose to share the selected folder with anyone who is part of the "Home" group or with specific users.
When you choose the "Home" group option, you can configure the access settings, allowing other users in the group to modify the data or choosing to limit their possibilities to read only
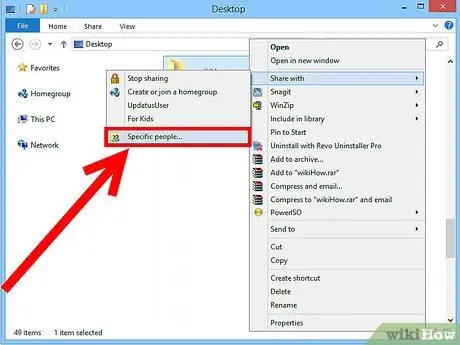
Step 4. Choose the "Specific users" option to decide which users to share the selected folder with
A dialog box will appear containing a complete list of all users who currently have access to the folder. You can add new users and customize their specific data access permissions.
- To share a folder with anyone connected to the network, go to the drop-down menu at the top of the window and choose the "Everyone" option. When finished, press the "Add" button.
- To share a folder with a specific user, go to the site drop-down menu at the top of the window and select or type its name, then press the "Add" button.
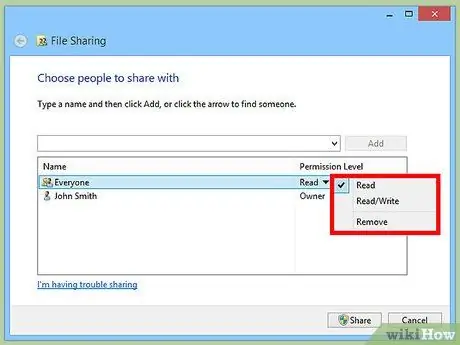
Step 5. Configure the access permissions for each user in the list
Find the user whose access permissions you want to change in the list. Look at the "Authorization Level" column and select the down arrow next to the current authorization level. Choose the new level from the appeared list.
- "Read": the user can view, copy and access the files in the folder, but cannot modify them or add new ones.
- "Read / Write": in addition to having access to the features offered by the "Read" permission level, the user can also modify existing files and add new ones. Users with this permission can also delete existing files.
- "Remove": this option deletes the permissions of the selected user and removes him from the list of users who can access the folder in question.
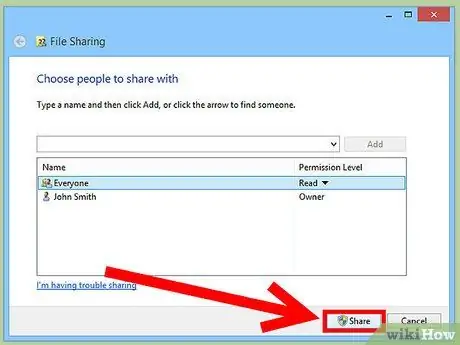
Step 6. Press the "Share" button
The permissions will be saved and the folder will become available for authorized users to access.
Use Public Folders
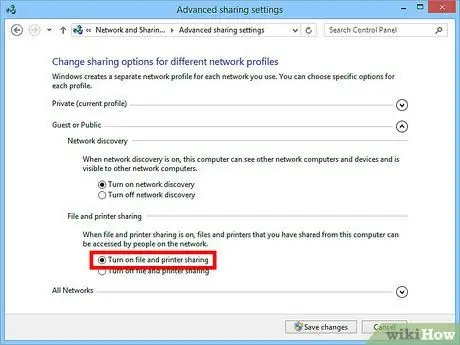
Step 1. Enable the "Public Folder Sharing" feature
They are directories that are shared with all users who have access to the network. Anyone can read and modify the data in a public folder without needing specific permissions. By default this feature is disabled, except for those who are part of the "Home" group.
- Windows 8: while you are in "Desktop" view mode, select the network connection icon on the taskbar with the right mouse button. From the context menu that appeared, choose the item "Open Network and Sharing Center". Click the "Change advanced sharing settings" link. Expand the "All Networks" profile, then locate and enable the "Public Folder Sharing" feature. When finished, press the "Save changes" button.
- Windows 7: access the "Start" menu, type "control panel" in the search field and press the Enter key. Double-click the "Network and Sharing Center" icon. Click the "Change advanced sharing settings" link. Expand the profile whose data sharing you want to enable ("Home or Work" or "Public"), then locate and enable the "Public Folder Sharing" feature. At the end press the button "Save changes" and, if necessary, type the password of the administrator account of the computer.
- Windows Vista: access the "Start" menu and choose "Control Panel". Select the "Network and Internet" category, then choose the "Network and Sharing Center" link. Expand the "Public folder sharing" item in the "Sharing and discovery" section, then turn it on. At the end press the relative button "Save".
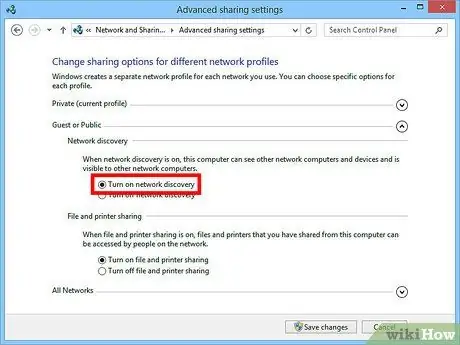
Step 2. Enable or disable the "Password Protected Sharing" feature
This option is located in the same panel where the "Public folder sharing" function is located. Once activated, only users with an account on this computer will be able to access its public folder. In this case, other network users will not have access to the folder.
Step 3. Find your public folders
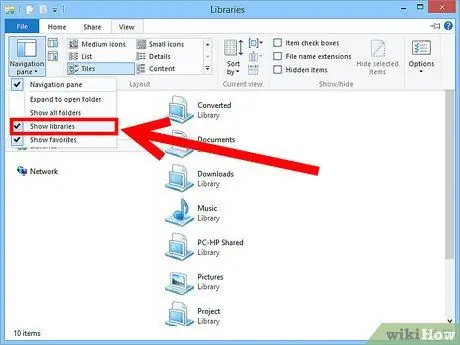
After enabling the "Public Folder Sharing" feature, you can start sharing your files with anyone with access to the network. The public folder belongs to the "Libraries" section of the "File Explorer" window and its access procedure varies slightly depending on the version of Windows you are using. There is a public folder in each of the entries in the "Collections" section ("Documents", "Music", "Pictures" and "Videos").
- Windows 8- By default, the "Collections" section is not displayed in Windows 8. To make it visible, select the item "This PC" thus opening the "File Explorer" window. Access the "View" menu tab, then press the "Navigation Pane" button on the far left of the menu bar. Check the item "Show collections" from the drop-down menu that appeared: the homonymous section of the side menu of the "File Explorer" window will thus become visible. Expand the library to which you want to add a file, then navigate to the corresponding public folder that appeared.
- Windows 7: access the "Start" menu and select "Documents". Expand the "Collections" and "Documents" folders located in the site pane on the left of the window that appeared, then select the "Public Documents" directory. If you wish, you can also have access to the public folders of other libraries.
- Windows Vista: access the "Start" menu and select "Documents". Select the "Publish" link located in the "Favorite Links" box on the left of the window that appeared. If it is not visible, choose the "Other" item and then select the "Publish" link that appears. Select the public folder you want to add new content to.
Step 4. Add new files
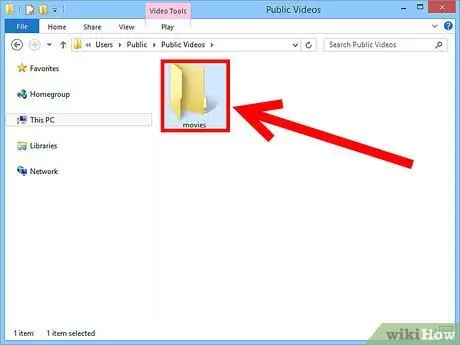
In a public folder, you can add any type of file you want, just like in any other folder. You can insert new items by dragging them from another folder, or by using the "Copy" and "Paste" functions.
Method 2 of 3: Mac OS X
Step 1. Go to "System Preferences"
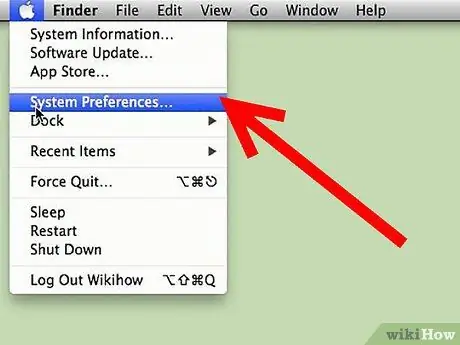
To do this, select the "Apple" menu and choose the "System Preferences" option. Make sure you are logged into your computer as an administrator.
Step 2. Select the "Sharing" icon
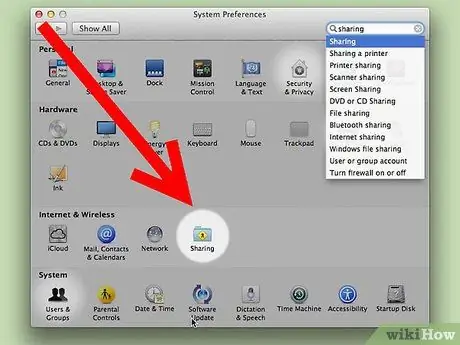
It is located in the "Internet and Wireless" section of the "System Preferences" window. This will bring up the "Sharing" window.
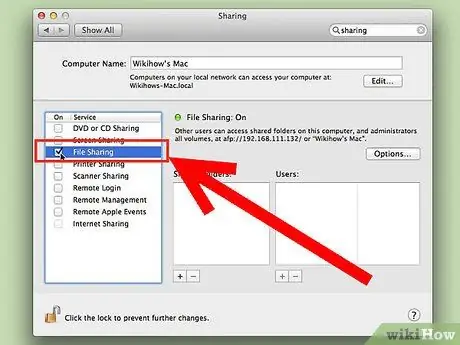
Step 3. Enable the "Share Documents" feature
To do this, select the "Share documents" check button in the left pane. This will activate the file sharing feature of your Mac, allowing you to share files and folders with other users connected to the network.
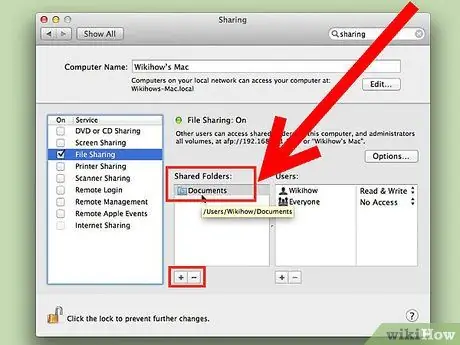
Step 4. Add the folders you want to share
Press the "+" button to open a new "Finder" window. Browse the contents of your hard drive to locate the folders in question. If you need to share a specific file, you need to create a special folder in which to copy it. Once you have finished making your selection, press the "Add" button.
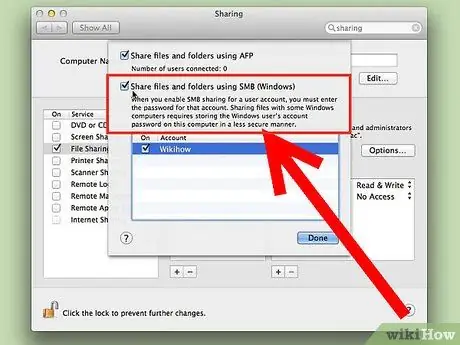
Step 5. Share a folder with Windows systems
By default, shared folders are only accessible by OS X machines. If you want to allow access also to users who use Windows computers, select the folder of your interest from the "Shared folders" list and press the "Options" button. Select the "Share files and folders via SMB (Windows)" checkbox, then click the "Done" button.
This way you can also configure access for specific users
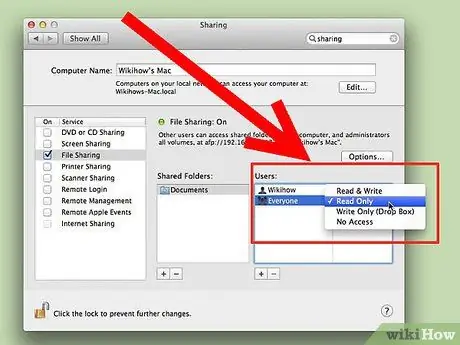
Step 6. Set the folder access permissions
Select the directory in question from the "Shared Folders" list. The "Users" box on the right contains the list of all those users who have the necessary permissions to access the folder. Press the "+" or "-" buttons, respectively, to add or delete an item from the list of authorized users.
Method 3 of 3: Linux
Access a Shared Folder on Windows Systems
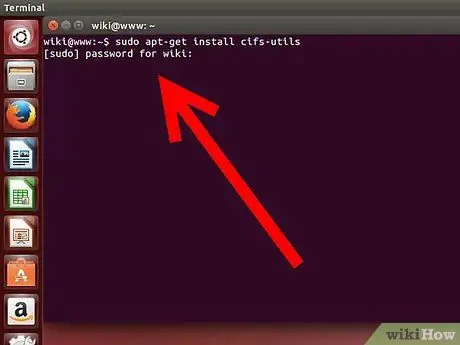
Step 1. Install software to mount the shared folder
In order to access a shared directory from a Windows system you need to install the "SMB" protocol. To do this, open a "Terminal" window (use the key combination Ctrl + Alt + T) and type the command sudo apt-get install cifs-utils.
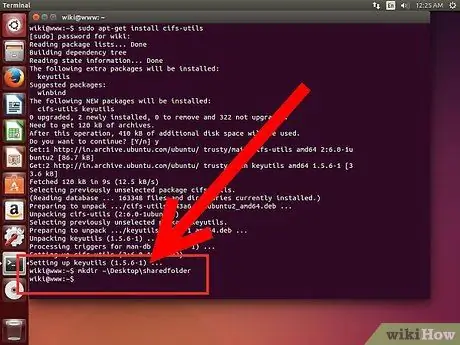
Step 2. Create a folder to serve as a local reference, on which to mount the shared Windows directory
Choose a spot that is easily accessible. You can do this using the GUI or a "Terminal" window via the mkdir command. For example, to create a folder called "shared folder" on the desktop, use the mkdir ~ / Desktop / shared folder command.
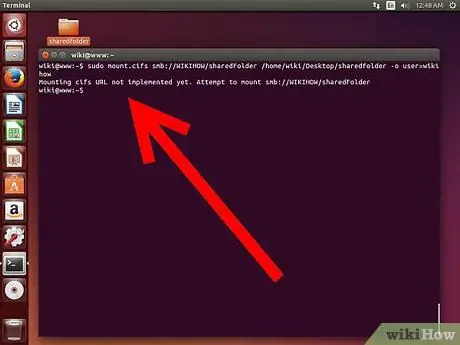
Step 3. Mount the shared folder
After creating the local backup directory, you can mount it using it as a link to the shared folder on your Windows computer. Proceed by opening a "Terminal" window again and type the following command (this procedure is based on the example "shared folder" folder created previously):
- sudo mount.cifs // Windows_computer_name / Shared Folder / home / username / Desktop / shared folder -o user = Windows_username
- You will be asked to enter the password of the Linux system root user, as well as that of the Windows account.
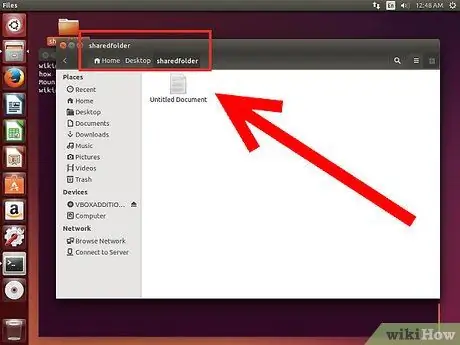
Step 4. Access the folder
To do this, go to the "shared folder" folder you mounted on. This way you will be able to directly access the shared files from the Windows machine. You will be able to add or remove files and directories according to your needs. To access the data shared on the Windows machine, you can also use the terminal window, without having to use the "shared folder" support folder.
Create a Shared Folder
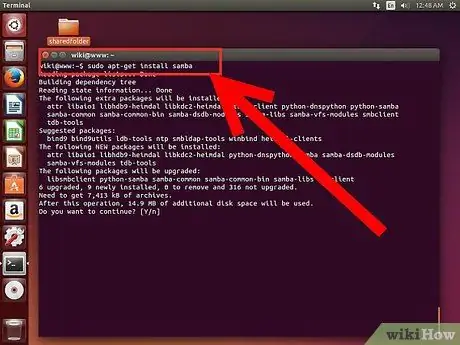
Step 1. Install Samba
Samba is an open source software that allows you to share folders and files with Windows systems. You can proceed with the installation of the program through a "Terminal" window using the command sudo apt-get install samba.
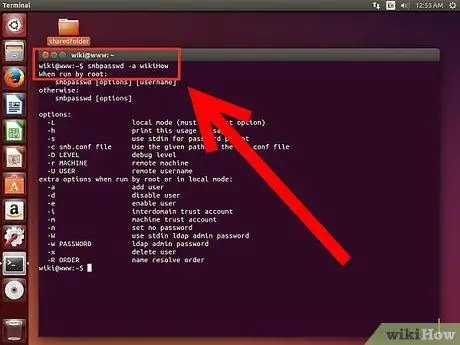
- After finishing the Samba installation, create a user account using the following command smbpasswd -a username. Of course, you will be asked to create a login password as well.
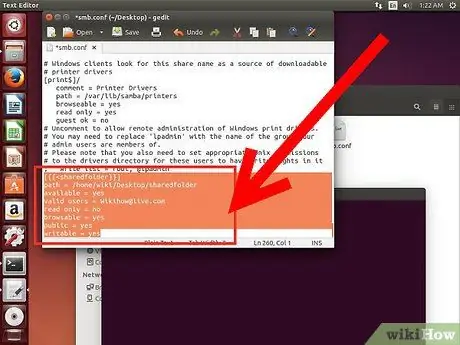
- Scroll to the bottom of the file and add the following lines of text:
- You can change the configuration as you like, according to your needs. For example, you can make the folder accessible as read-only or not make it public.
- In the configuration file, you can add multiple entries, one for each folder you want to share.
- Keep track of who you share your folders with. If there is any content you don't want to be viewed, edited or deleted, remove the share.
- An unsecured wireless network allows unknown users to access your shared folders.
Step 2. Create a directory to share
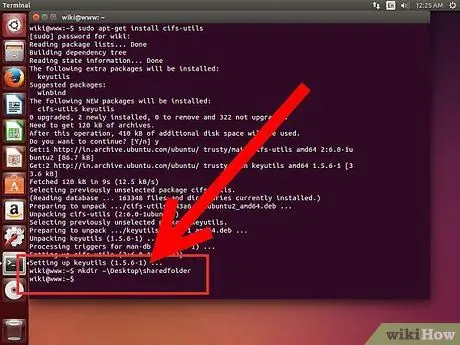
If you wish, you can use any existing folder, but creating a specific folder will facilitate the configuration of access on other computers. To create a new directory, use the mkdir command.
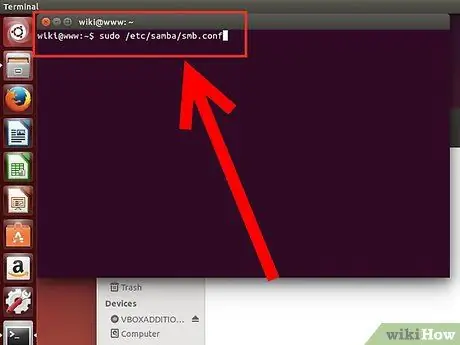
Step 3. Open the Samba configuration file
To do this, use the command sudo vi /etc/samba/smb.conf. Although the "vi" text editor is used in this example, you can decide to use whichever one you prefer. The contents of the configuration file will be displayed in the editor window.
Step 4. Save the file
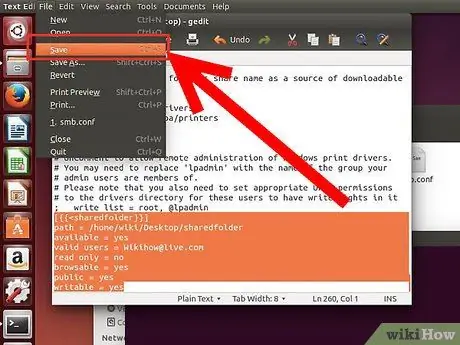
When you're done making changes, save the file and close the editor. Restart the SMB service using the sudo service smbd restart command. In this way, the new configuration file will be loaded at the next start and the new folders present will be shared according to your settings.
Step 5. Find your IP address
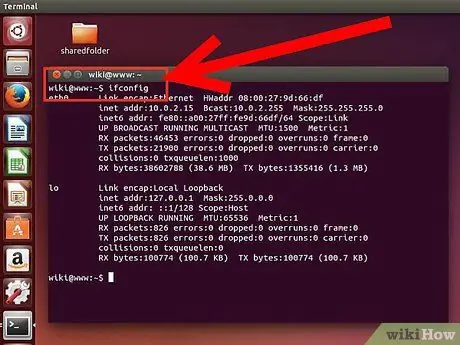
In order to access shared folders using a Windows system, you will need to know the IP address of your Linux computer. Then type the following ifconfig command into a "Terminal" window and take note of the information you are looking for.
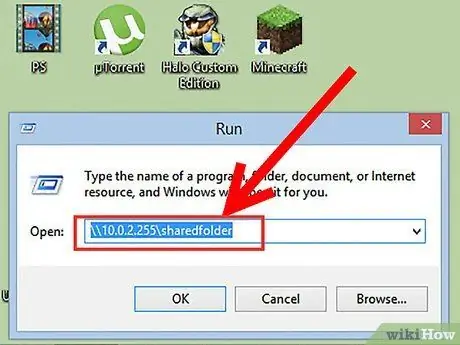
Step 6. Access the folder in question from a Windows system
Create a new shortcut anywhere on your Windows computer. To do this, select an empty spot with the right mouse button, for example on the desktop, then choose "New" and finally "Connection". In the link path field, type the IP address of the Linux computer followed by the name of the folder you want to access: / IP_address / folder_name. Press the "Next" button to name the new link, then press the "Finish" button to finish. By opening the newly created link you will be able to view the contents of the shared folder.


