All versions of the Windows operating system integrate a very simple and intuitive basic program for managing images called Microsoft Paint. Previously known as Paintbrush, Paint allows users to create or edit images using basic functionality, without having to purchase (very expensive) professional software, such as Photoshop. Even if Paint has the reputation of being too simple a program, in reality if you know where to look, it amazes for the high number of features that it provides to the user.
Steps
Part 1 of 3: First Steps
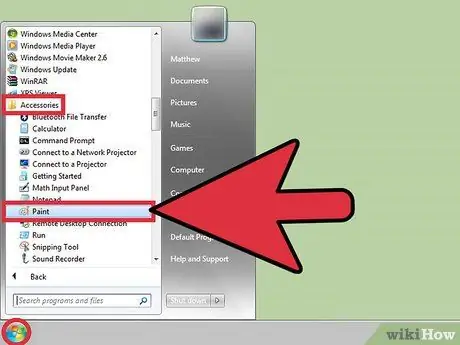
Step 1. Start Paint
You can do it as you would in the case of any other program. However, the procedure to follow may vary slightly depending on the version of Windows you are using.
-
Windows 10: go to the "Start" menu, click the magnifying glass icon, type in the keyword
paint
- , then select the "Paint" icon from the search results list;
-
Windows 8: place the mouse cursor in the upper or lower right corner, then choose the "Search" option from the side menu that appeared (if you have a touchscreen device, swipe your finger on the screen from right to left). Type in the keyword
paint
- , then select the "Paint" icon from the search results list;
- Windows Vista and Windows 7: access the "Start" menu, select "All Programs", choose the "Accessories" option and then select the "Paint" icon.
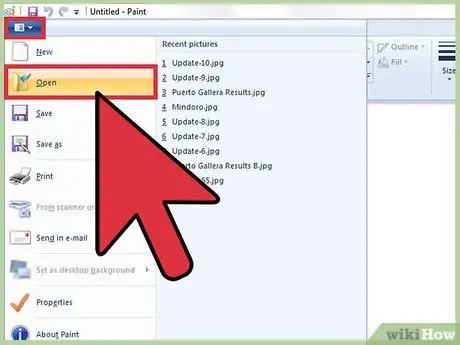
Step 2. Open an image
Paint can handle many of the image-related file formats: BMP, GIF, JPG, JPEG, TIF, TIFF, ICO and PNG. To open an image with Paint, go to the "File" menu and choose the "Open" option. At this point select the folder where the file you want to upload is stored, select it and press the "Open" button.
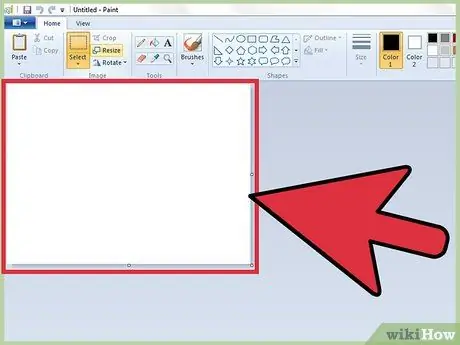
Step 3. Understand how Paint's "canvas" works
When you open the program the first thing you see is a totally white area inside the window; imagine that it is a painter's canvas or a blank sheet on which you can draw or write freely. You can resize the size of the Paint workspace before you start creating your own masterpiece.
- Windows 7 and later: Go to the "Home" tab, then choose the "Resize" option. A small dialog box will appear with which you can resize the workspace. Choose the "Pixel" item, then use the "Horizontally" and "Vertically" fields to enter the desired size in pixels. Alternatively, you can resize using a percentage of the current size by choosing the "Percent" radio button and entering the percentage by which you want to increase or decrease the current surface of the work area. For example, if you need to halve the current image size, you will have to enter the value 50 in each of the two fields; on the contrary, if you want to double it, enter the value 200.
- Windows Vista: Go to the "Image" menu, then choose the "Attributes" option. Enter the desired dimensions for the work area (in pixels) using the "Width" and "Height" text fields.
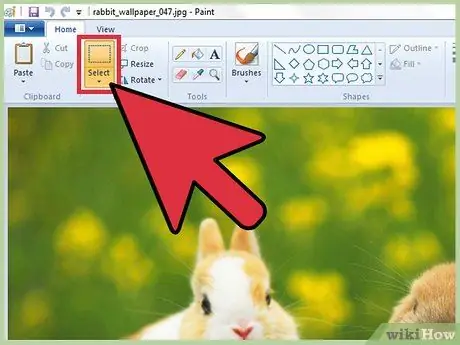
Step 4. Cut out a portion of an image
Open an existing image using Paint, then click the "Select" tool icon at the top of the window. Now click the upper left corner of the image area you want to keep, then drag the mouse to the lower right corner without releasing the left button, until all the affected section is completely included in the selection. At this point, release the left mouse button and click the "Crop" item.
Step 5. Resize an image
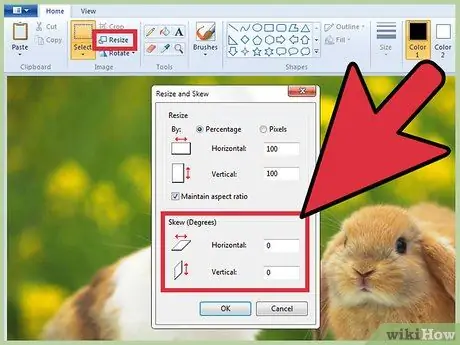
Access the "Image" menu, then choose the "Stretch / Tilt" option (if you are using Windows 7 or later, simply select the "Resize" icon located on the toolbar). Alternatively, you can use the hotkey combination Ctrl + W to directly open the "Resize and Skew" dialog box. Type the desired value (in pixels or percentages, exactly as you did to resize the Paint workspace) to increase or decrease the current image size.
Step 6. Rotate an image
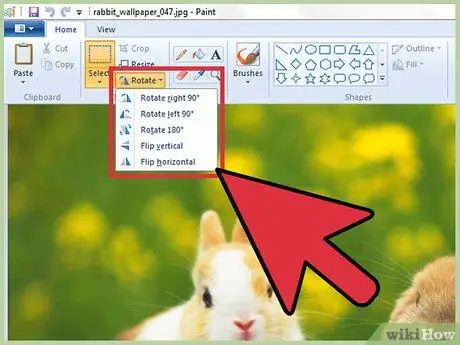
To flip a photo vertically (or rotate it in other directions), you need to use the "Flip / Rotate" tool.
- Windows 7 and later: select the "Rotate" option on the Paint toolbar, then choose one of the options from the drop-down menu that appears.
- Windows Vista: Go to the "Image" menu, choose the "Flip / Rotate" option, then choose which direction to rotate the image.
- Alternatively, you can use the hotkey combination Ctrl + R to have direct access to the "Flip and Skew" dialog box.
Step 7. Use the "Zoom in" and "Zoom out" features
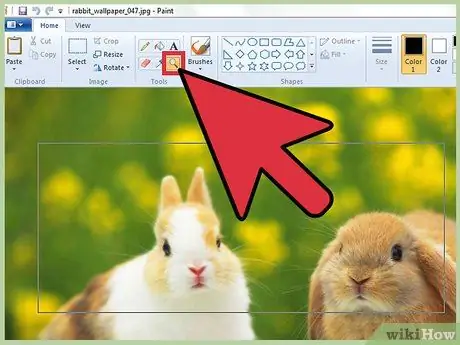
To enable the use of the "Zoom" tool, click the magnifying glass icon. To use the "Zoom in" function, click the area of your interest with the left mouse button, while to use the "Zoom out" function, use the right mouse button. Alternatively, you can use the hotkey combination Ctrl + Page Up to zoom in and Ctrl + Page Down to zoom out.
Step 8. Learn how to eliminate errors using the "Undo" function
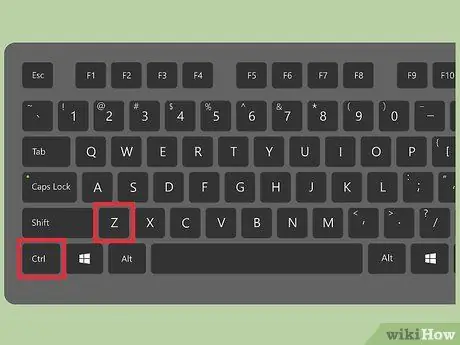
If you made a mistake using any of Paint's tools, you can take advantage of the "Undo" feature to cancel the last action performed by pressing the Ctrl + Z key combination.
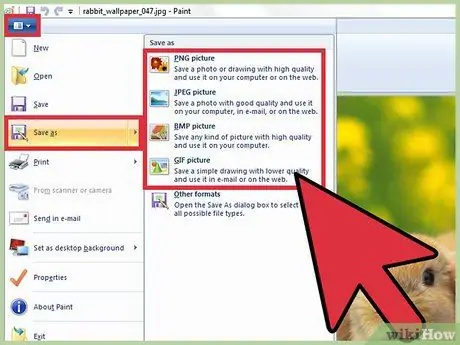
Step 9. Save your work
Access the "File" menu or tab, then select the "Save As" item to choose where to save the file and with what name. You will also have the option to choose the file format to use for saving. This choice is based on the next use you will have to make of the image. The-j.webp
In any case, you always have the option to convert an image to another file format. Check out this article to find out how to convert a JPEG image to another format
Part 2 of 3: Drawing and Coloring
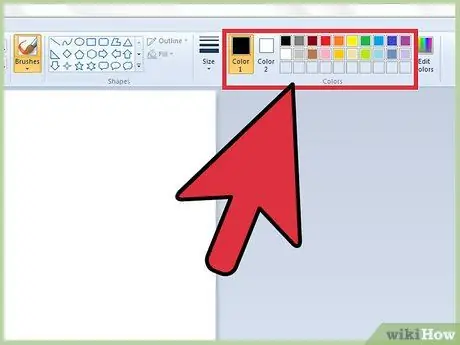
Step 1. Get familiar with the color palette
The grid made up of small colored squares, located at the top of the window, shows the predefined colors that Paint makes available. When you click on one of these squares, the respective color is selected as the main coloring for whichever tool you are going to use. You can also set a secondary color, which can be used as a fill or background color when you start working with shapes.
- Windows 7 and later: The main color is referred to by Paint as "Color 1", while the secondary color is referred to as "Color 2". Select the "Color 1" icon, then choose one of the colors present in the Paint color palette. Now click the "Color 2" icon and choose the coloring to use as the secondary color.
- Windows Vista and earlier: Find the two small, slightly overlapping colored squares located to the left of the Paint color palette. The square in the foreground represents the main color, while the square in the background represents the secondary color. To set the latter, select one of the colors in the Paint palette using the right mouse button.
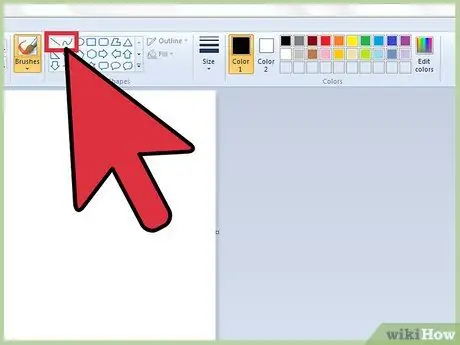
Step 2. Draw a curved or straight line
There are two tools to use in this case: "Line" and "Curve". Depending on the version of Paint you are using (which depends on your Windows version), you will find them inside the toolbar located at the top or left of the Paint window.
- To draw a straight line, select the "Line" tool, then choose the coloring you prefer using the Paint color palette. Click anywhere in the work area, then drag the mouse pointer in the desired direction, without releasing the left button. When the line you drew is long enough, you can release the left mouse button.
- To draw a curved line, select the "Curve" tool characterized by an icon in the shape of a curved line. Draw a straight line exactly as you did in the previous case using the "Line" tool. After releasing the left mouse button, click anywhere on the line and, without releasing the mouse button, drag it in the direction you want to curve it.
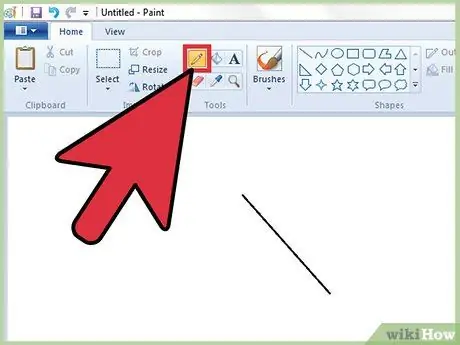
Step 3. Draw freehand using the "Pencil" tool
The latter allows you to draw freehand, exactly as you would using a pencil and a common sheet of paper. The stroke size can be changed using the "Size" drop-down menu and choosing one of the options provided. To start drawing, simply hold down the left mouse button while moving the relative pointer within the workspace.
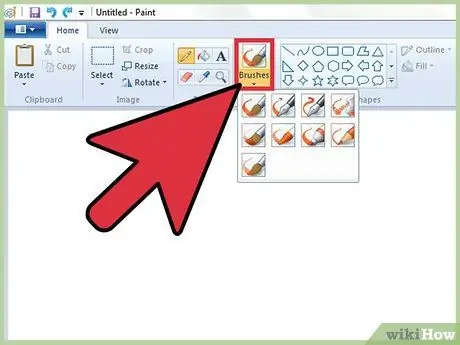
Step 4. Color your creations using the "Brush" tool
The latter is much more versatile than the "Pencil" tool, since it is possible to choose different types of strokes to obtain a more personal effect.
- Windows 7 and later: Go to the "Brushes" drop-down menu, then choose the type of stroke you want to use. You can also change the size of the line generated by each brush using the "Size" menu.
- Windows Vista and earlier versions: click the "Brush" icon, then choose the type of stroke you prefer from the context menu that appears. At this point select the color using the Paint palette, then drag the mouse pointer over the "canvas" to draw what you want.
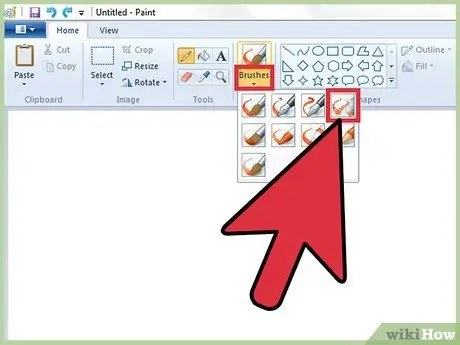
Step 5. Use the "Airbrush" tool
It is a tool that works in a similar way to the "Brush", but the effect obtained is very similar to that generated by a spray paint can.
- Windows 7 and later: You can select this tool from the "Brushes" drop-down menu.
- Windows Vista and earlier: Select the spray can icon located within the toolbar. Use it to draw the lines you want, exactly as you would using the "Pencil" or "Brush" tool.
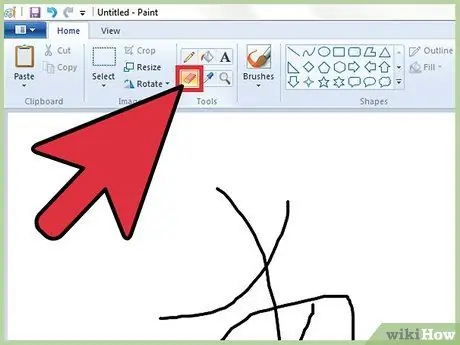
Step 6. Erase imperfections
To erase a small mistake made using any of the tools available, you can use the "Eraser" tool. Select its icon (an eraser), then drag the mouse pointer over the area you want to remove from the drawing. Again, you can change the size of the stroke via the "Size" drop-down menu.
Note: The secondary color (named "Color 2" if you are using Windows 7 or later) is the one that the "Eraser" tool uses to overwrite the indicated area. For example, if you need to erase a red line on a white background, make sure you have chosen white as a secondary color or as "Color 2"
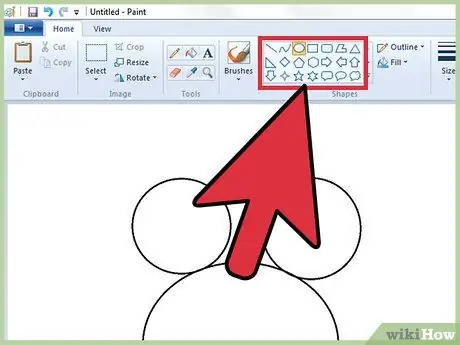
Step 7. Draw shapes
Select any of the shapes present in the toolbar to be able to draw it. After selecting the desired one, you will see some options appear related to the final appearance that the shape will take after drawing it.
- If you're using Windows 7 or later, use the "Outline" and "Fill" drop-down menus to access a wider set of options. If you are using Windows Vista or an earlier version, you will have three options: one characterized by the chosen shape in which only the outer edges are visible, one characterized by the chosen shape in which the outer edges are visible and a fill color and the last in which the completely colored chosen shape is visible.
- Choose the fill and outline options of the chosen shape according to your needs, then click the point in the Paint workspace where you want the selected shape to be drawn. Hold down the left mouse button while moving it to increase the size of the shape you are drawing. When the latter has reached the desired size, you can release the mouse button.
- If you have chosen to draw only the outline of the selected figure, remember that, to do so, the main color currently set ("Color 1") will be used. If you have chosen one of the fill options, the secondary color ("Color 2") will be used instead.
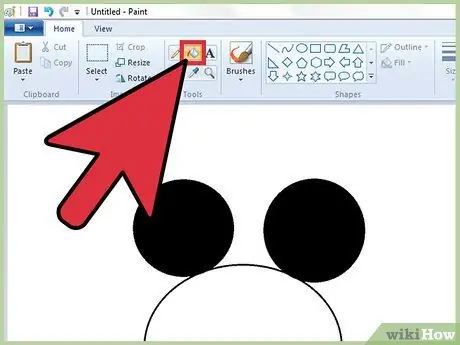
Step 8. Paint a bounded area
To do this, you can use the "Fill" tool (characterized by a classic can of paint) which is able to fill an entirely delimited area with a specific color.
- Click the paint can icon that overflows with some content, then choose the color you want to use from Paint's color palette. At this point, click a point in the work area to color it completely with the chosen color.
- The "Fill" tool is designed to paint an area completely delimited by lines. To familiarize yourself with this feature of Paint, try drawing a square or a circle, then color the inside using the "Fill" tool. To obtain a noticeable effect, do not use the same color to trace the contours of the figure and to color the inside.
Part 3 of 3: Learning to Use Advanced Features
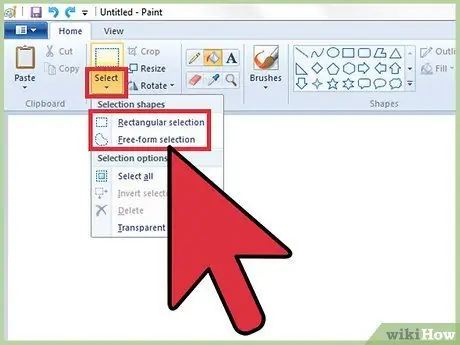
Step 1. Find out how to use the different selection tools
Paint offers the possibility of using two different selection tools to highlight a specific area of an image: "Freehand Figure Selection" (characterized by an icon with dashed outlines and an oval and curvilinear shape) and "Rectangular Selection" (characterized by a rectangular icon with a dashed outline). The freehand selection allows you to draw a selection area that perfectly fits the outline of a subject or a specific part of an image, while the rectangular selection allows you to simply select a rectangular area of the image.
- If you are using Windows 7 or later, click the "Select" drop-down menu, then choose the "Freehand Figure Selection" or "Rectangular Selection" option. In Windows Vista and earlier versions, you will find both icons within the Paint toolbar.
- Both tools are used by starting by clicking the upper left point of the area you want to select and dragging the mouse cursor until the selection is complete. It is evident that the "Rectangular Selection" tool is much easier and faster to use, but it is also much more limiting than the "Freehand Figure Selection". When the selected image section has been completely selected, you can release the mouse button.
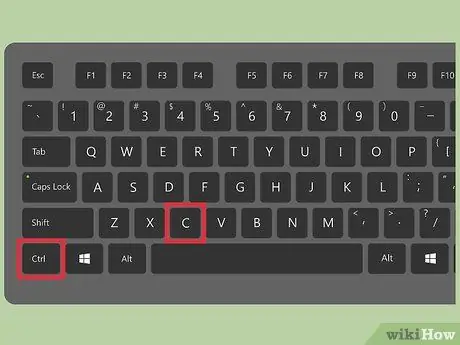
Step 2. Copy and paste the selected area
To copy it, press the hotkey combination Ctrl + C, then paste it wherever you want (in a new Paint document or within any compatible program, such as Microsoft Word or Power Point) by pressing the key combination Ctrl + V.
-
If you want the background color used to be outside your selection, follow these steps:
- Windows 7 and later: check the "Transparent selection" option found in the "Select" drop-down menu.
- Windows Vista and previous versions: identifies the two icons in the toolbar characterized by multicolored geometric solids on which a rectangular selection area is superimposed. Select the lower icon of the two (the one with the transparent background). Subsequently, to disable the use of this tool, click the icon located at the top of the two.

Use Microsoft Paint in Windows Step 20 Step 3. Add some text
Select the "Text" tool by clicking on its icon in the shape of "A", then select the point where you want to insert the text with a double click of the mouse.
- A dashed-out text box will appear, on which the anchor points (in the shape of small squares) will be visible. Before using another Paint tool, make sure your typed text is correct and looks the way you want it. Unfortunately, after closing the text box, you will no longer be able to change its content.
- To increase the size of the text box (so that you have more space to write), select one of the anchor points with the left mouse button (its pointer will turn into a small arrow), then drag it to the desired point.
- Change the font type and size using the controls located at the top of the window, then start composing your text. To change the latter after typing it, you will simply have to highlight it with the mouse and make the desired changes in terms of color, size and font. When the entered text is exactly the way you want it, you can click anywhere in the Paint workspace to disable the use of the "Text" tool.

Use Microsoft Paint in Windows Step 21 Step 4. Skew an image
Using Paint it is possible to distort the appearance of an image using the "Skew" feature of the "Stretch / Skew" tool available in the "Image" menu (if you are using Windows 7 or later, simply click the "Resize" icon "in the toolbar). It is possible to skew the image by a specific number of degrees, which will be entered in the text fields "Horizontally" and "Vertically".

Use Microsoft Paint in Windows Step 22 Step 5. Try using the "Color Picker"
It features a dropper icon. Select this tool, then click anywhere on the design or image under examination. The color of the selected area will be used as the main color for the tool you will use later.

Use Microsoft Paint in Windows Step 23 Step 6. Create a custom color
Paint also offers the possibility to create new colors (starting from the basic ones or from scratch) using the "Edit Color" tool. Using the latter it is possible to modify the hue, brightness and saturation of a color, as well as being able to indicate the value assumed by its main components (red, green and blue). Click the "Change Color" icon to access the tool dialog box. When you have recreated the color you need, press the "Add to custom colors" button to be able to use it.

Use Microsoft Paint in Windows Step 24 Step 7. Try using the "Ruler" or the "Grid"
Creating perfectly symmetrical designs isn't easy at all when using the mouse, so you may need to use reference points to make your work easier. Go to the "View" tab, then select the "Rulers" check button to bring up the vertical and horizontal rulers. Select the "Grids" checkbox to make a grid appear in the background of the Paint workspace. You can disable these two features at any time by deselecting the relative check buttons.

Use Microsoft Paint in Windows Step 25 Step 8. Learn how to use hotkey combinations
This tool can significantly increase your productivity and thus save you valuable time. Here is the list of some of the more useful key combinations:
- Rotate: Ctrl + R;
- New document: Ctrl + N;
- Cut: Ctrl + X;
- Paste: Ctrl + V;
- Copy: Ctrl + C;
- Save: Ctrl + S;
- Delete: Del;
- Print: Ctrl + P;
- Undo: Ctrl + Z;
- Select all: Ctrl + A;
- Open: Ctrl + O;
- Repeat: Ctrl + Y;
- Hide the toolbar: Ctrl + T;
- Open the "Attributes" or "Image Properties" window: Ctrl + E;
- Open the "Resize and Skew" or "Stretch and Skew" window: Ctrl + W;
- Hide the color palette: Ctrl + L;
Advice
- To draw thicker lines using any of Paint's tools, select the one you want, then press the hotkey combination Ctrl ++. Conversely, to reduce the thickness of the stroke, press the key combination Ctrl + -.
- If you want to draw perfectly straight lines vertically, horizontally or at a 45 ° angle, hold down the ⇧ Shift key while drawing them with the mouse. Similarly, if you need to draw geometric shapes that have all sides of identical length, hold down the ⇧ Shift key while drawing them using the "Shapes" tool.


